Actions
Creating a document
A new document can be created from the publisher:
- Go to the website or folder where you want to place the document.
- Click the "New file" button and choose "Rich Text document"
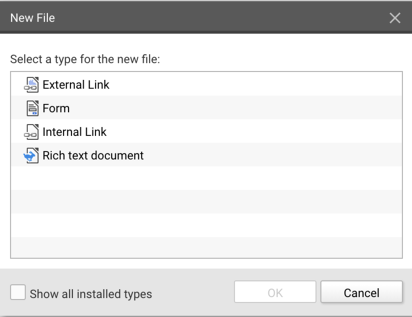
- Click "OK" to continue.
- The file properties are displayed. You can change the file name (used for the URL) and choose a title (used for navigation).
- Do not check the "Publish this file" option yet - if you do, the (empty) file will be published straight away.
- Click "OK" to create the file.
- Double click on the file and or choose "Open" from the context menu.
The Rich Text editor will be opened and you can start editing the document.
Saving and Publishing
A newly added Rich Text Document (RTD) file is not automatically published. You can change the contents and use "Save" the store the changed document, but then the document is still not published. Other Publisher users can see and edit the saved document.
When the document is ready to be placed online the "Publish" action is used; this actions saves and publishes the document.
Changing a published document
Once a document is published you can still change the contents of the document. When you save these changes, the published version of the document (the online version) remains unchanged. Other Publisher users can see and edit the saved changes. When you another user chooses to publish the document, the changes are published.
The publisher file list shows the possible states the document is in:
| The file is not (yet) published. Nothing is visible online. Changes can be saved. |
| The file is published and is visible online. |
| The file is published, but additional changes have been saved for this document. The published version is visible online, the changes are not visible until the file is published again. |
(These are the most often occurring states the files can be in. For a full list, see the Publisher manual).
Sending a preview link
You can use a preview link to show someone what the page is going to be when it's published.
- Make sure you have saved, unpublished changes.
- Choose "Previewlink" from the "View" button menu.
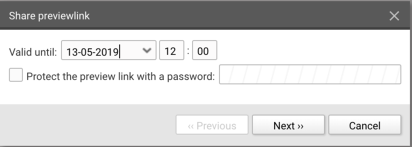
- Choose until what moment this page is available.
- You can set a password protection - the visitor who visits the link will have to provide this password.
- Click "Next" to continue.
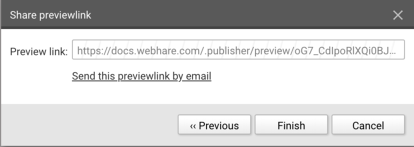
- You can copy the preview link and send it to whom you want. Make sure you also communicate the password if you have set this.
- Click Finish to enable the link.
You can keep working on the document after you have sent the preview link. When you save changes these will be visible until the expiration date - however, if the document is published the link will no longer work.
Images
You can use insert an image using the "Image" ![]() button in the toolbar. Choose an image to upload from your computer. The image placed directly in to the document.
button in the toolbar. Choose an image to upload from your computer. The image placed directly in to the document.
After placing the document you can edit the properties by either double clicking the image or selecting the image and clicking the "properties" button in the toolbar. ![]()
The image properties allow you to set the image positioning and size. For accessibility reasons an alternative text (used for visually impaired browsers for example) can be added. On the second tab a hyperlink can be added for the image.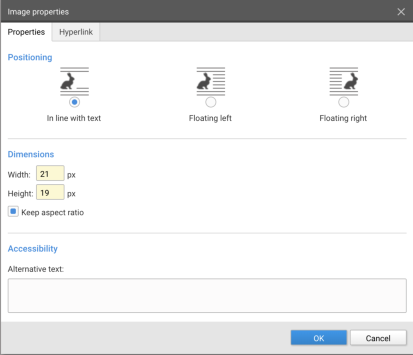
Hyperlink
- To add a hyperlink, select the text you want to turn into a link: this can be a word, sentence or an entire paragraph.
- The "hyperlink" button in the toolbar is now enabled:
 .
. - Press it to show the hyperlink dialog:
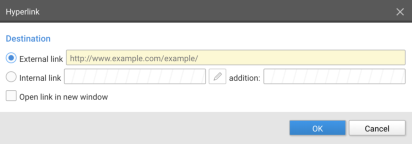
- When you choose to add an external link you need to enter the entire address, including https:// or http://
- When you choose to add an internal link you first choose "internal link", after which the "edit" button is enabled. This opens a browse dialog in which you can choose the link destination.
- If needed you can add an addition to the link - for instance to add an "anchor" (#anchor).
- When you check the "Open link in new window" option the link will be opened in a new browser window or tab, depending on the visitors preference.
- Press "OK" to add the link.
Insertable objects
Depending on your website different object types can be inserted. These can range from videos to text in columns, contact information or slideshows. Use the "Insert option" button and choose from the available options. What you can set for the object depends on the object type you are adding.
After you have added the insertable object you can hover your mouse over the object to display a hovering buttonbar, featuring an 'insert line above object', 'insert line below object', 'edit' and a 'delete' button. 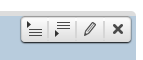
Tables
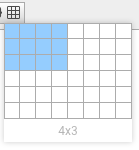
The "Tables" button ![]() can be used to create tables: click the button and select the desired height and width.
can be used to create tables: click the button and select the desired height and width.
When you have placed your cursor inside of a table you can use the context menu (right mouse button) for available actions:
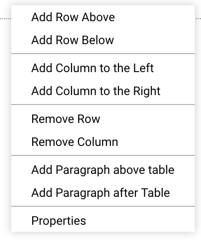
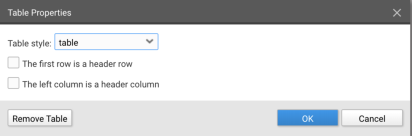
To delete the entire table, choose "Properties" from the context menu and use the "Remove table" button: